
Introduction
Git is a dispensed version manage gadget (DVCS) extensively utilized in software improvement to control and music modifications to code. in contrast to centralized model control structures, including Subversion, Git does not depend upon a crucial server to shop the repository. As an alternative,, each consumer has an entire reproduction of the repository, which includes its full records, on their nearby machine. This disbursed approach offers numerous advantages, along with offline paintings, strong branching and merging capabilities, velocity and overall performance, and improved security and integrity. Usually, Git provides a dependable and green way to manage and song code modifications, making it a famous preference for model management in software program development.
Branches Advent
In GitHub, growing branches is a fundamental factor in handling your Git repositories and participating with others. Branches allow you to work on new functions, computer virus fixes, or experiments without affecting the principle codebase (frequently referred to as the "master" or "important" branch). here's how you could create branches in GitHub.
1. Navigate in your Repository: Visit the GitHub internet site and navigate to the repository where you need to create a brand new branch.
2. Get the right of entry to the branch Dropdown: On the repository's principal web page, you may see a dropdown menu categorized "branch: primary" (or another default branch call). click on in this dropdown to show a textual content field for developing a new department.
3. Create a brand new branch: Enter a name for your new department within the textual content container. choose a descriptive name that displays the purpose of the branch, along with "characteristic/new-characteristic" or "bugfix/difficulty-123". make sure branch names comprise no areas or special characters.
git checkout -b bugfix-trouble-123
4. Create the branch: Press enter or click the "Create branch: your-department-call" button to create the new department. GitHub will create the department based totally on the modern nation of the default department (e.g., main) in your repository.
5. Transfer to the brand new branch: After growing the department, GitHub will routinely switch you to the brand new department. you can confirm this with the aid of checking the department dropdown, which has to now displays the call of your new branch.
6. Paint on your department: You can now work for your department, making changes to files, adding new functions, or solving bugs. commit your modifications to the branch as you usually might the use of Git.
7. Push the department to GitHub (elective): In case you want to push your department to GitHub to collaborate with others or return up your work, use the git push command in your nearby repository.
For example:
Replace "your-branch-call" with the call of your branch.
8. Merge the department (optional): as soon as you have finished your work at the branch, you may merge it lower back into the primary codebase (e.g., major department) with the Use of a pull request on GitHub. This permits others to study your modifications earlier than they're merged. Developing branches in GitHub is an essential part of the Git workflow and permits you to work on a couple of functions or fixes concurrently while maintaining a clean and prepared codebase.

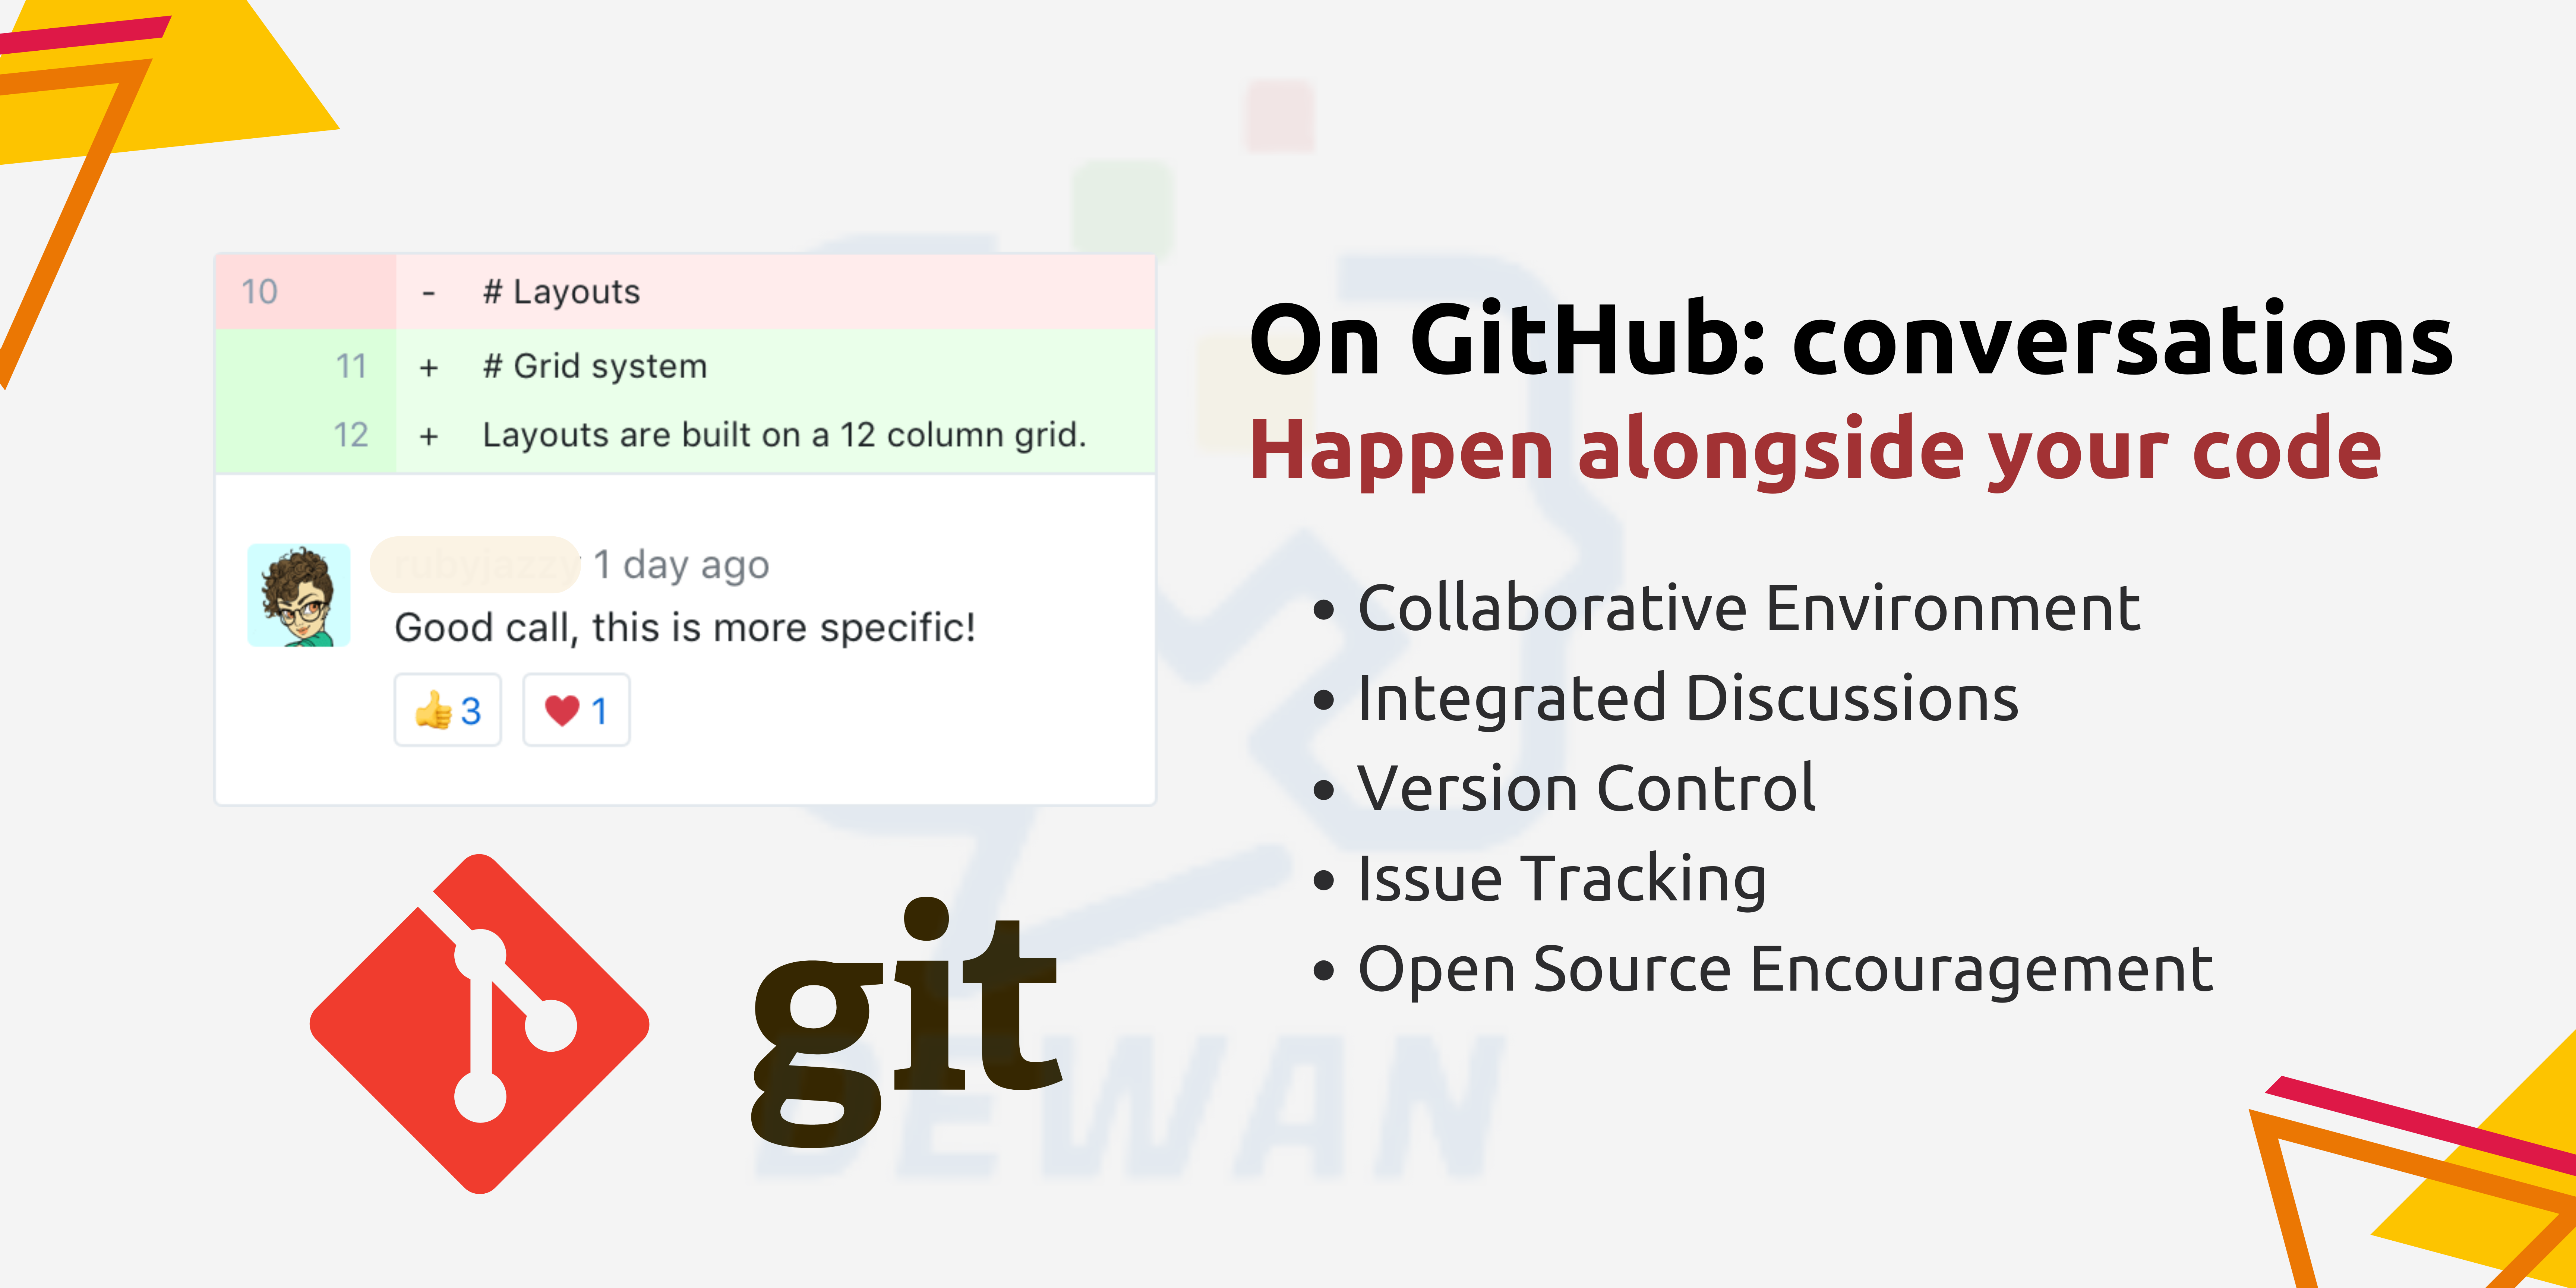
Code Dedicate
Committing code in GitHub is a fundamental aspect of the Git version control system and is used to save your changes to the repository's history. Here's how you can commit code to a GitHub repository.
1. Clone the Repository: If you haven't already done so, clone the repository to your local machine using the git clone command. Git commit -m 'bugfix-issue-123: Fixing a part of the issue'.
For example:
Update "your-username" along with your GitHub username and "your-repository" with the name of your repository.
2. Navigate to the Repository: Use the cd command to navigate to the repository's listing on your local machine.
For example:
3. Make Changes: Edit the files in the repository using a text editor or IDE. Make the necessary changes for your feature, bug fix, or improvement.
4. Stage Changes: Use the git add command to stage the changes for commit. You can either stage all changes or specific files.
For example, to level all adjustments, use:
To stage-specific files, use
5. Dedicate Modifications: As soon as your adjustments are staged, devote them to the repository using the git dedicate command. Include a meaningful message that describes the adjustments.
You may also like to read : Importance of Drush in Drupal Website Development
For example:
Push Changes to GitHub: If you want to push your changes to the GitHub repository, use the git push command.
For example:
Update Prince Pal with the call of your branch if you're operating in a one-of-a-kind department department.
Affirm adjustments on GitHub: After pushing your adjustments, you can verify that they were correctly deleted with the aid of checking the repository on the GitHub website. Your commit record has to reflect the adjustments you made.
Committing code in GitHub is an essential part of the improvement manner, as it permits you to shop and tune your changes over the years. every dedication creates a photograph of your codebase, making it less difficult to collaborate with others and revert to previous ones if needed.
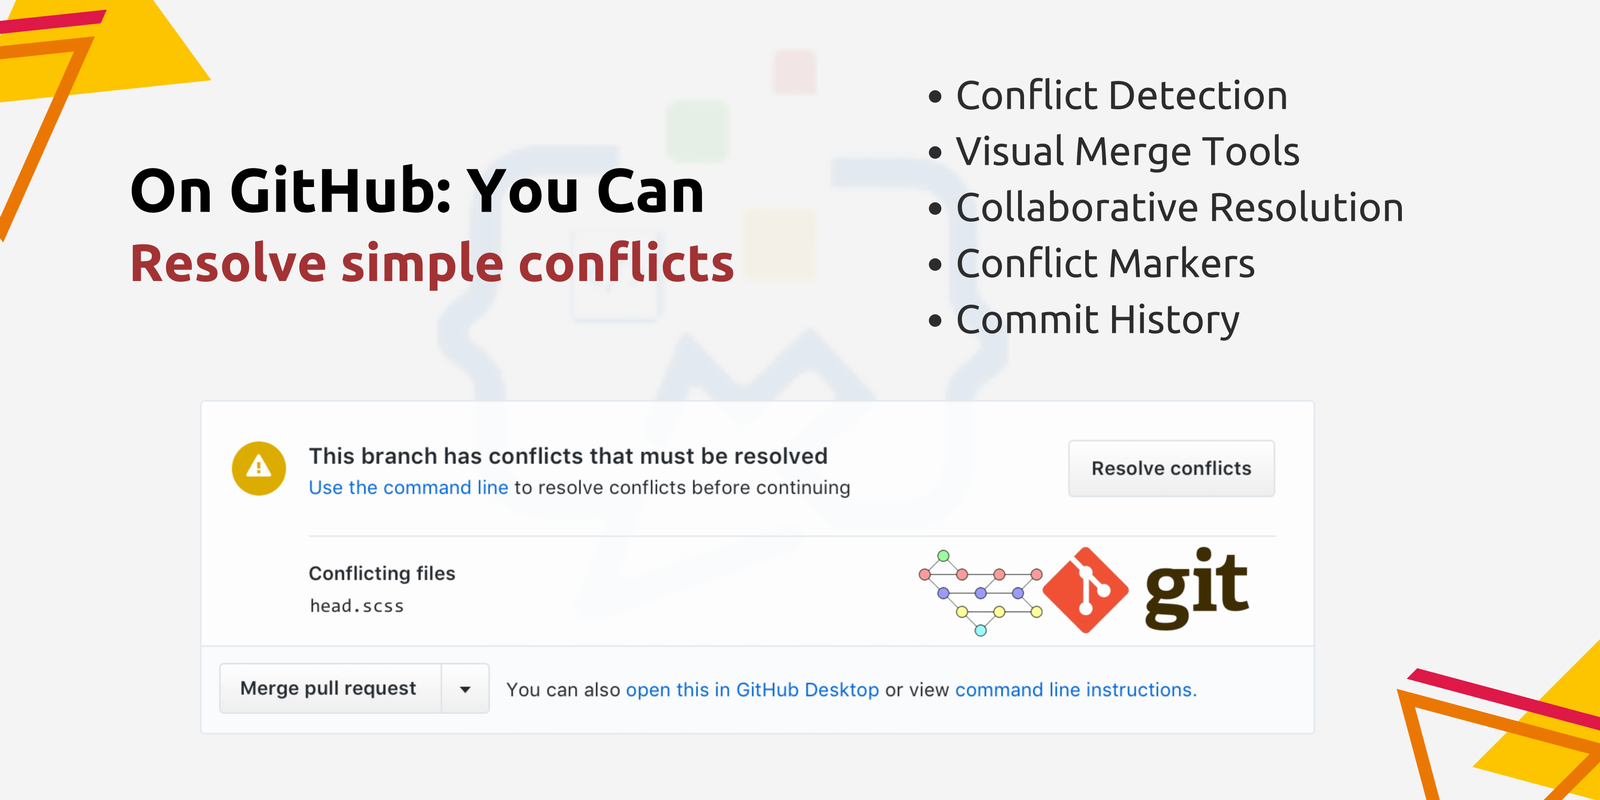
Git Conflict Clear-Up
Resolving conflicts in Git, in particular, on GitHub, involves some steps to apprehend and remedy the conflicting modifications. Right here's a detailed guide on a way to solve conflicts.
1. Pick out the battle: While you encounter a battle, Git will notify you with a message that shows which files have conflicts. you could additionally use git status to peer which files are conflicted.
2. Open the Conflicted document: Open the conflicted report(s) to your code editor. You'll see markers indicating the conflicting changes, generally <<<<<<<, =======, and >>>>>>>.
3. Apprehend the struggle: Among <<<<<<< and ======= are your current branch's changes, and between ======= and >>>>>>> are the incoming changes from the alternative branch.
4. Resolve the conflict: Manually edit the conflicted record to include the changes you need to make. Cast off the conflict markers and adjust the content material as wanted.
5. Stage the Resolved report: After resolving the warfare, level the resolved report(s) using git add.
6. Dedicate the Resolved changes: Dedicate the resolved adjustments using git commit. You could add a dedicated message explaining the way you resolved the struggle.
7. Push the adjustments: In case you're resolving conflicts in a department, push the adjustments to the faraway repository using git push.
8. Resolve Merge Conflicts on GitHub (optionally available): If you're resolving conflicts on a pull request on GitHub, you could resolve conflicts at once on the GitHub website. GitHub gives a web-primarily based interface for resolving conflicts, allowing you to choose the modifications you need to keep.
9. Merge or Rebase: After resolving conflicts, you could whole the merge or rebase operation relying on your workflow.
It is important to communicate along with your crew when resolving conflicts, particularly if the conflicts contain huge modifications. know-how how conflicts occur and a way to solve them is vital for participating effectively with Git.
Merging Two Commits Into One
To merge two commits into one, you may use an interactive rebase. here is a step-by-step guide.
1. perceive the Commits: First, you want to pick out the 2 commits you want to merge. you can use the git log to view the devote records and locate the devote hashes of the two commits.
2. Start an Interactive Rebase: Open your terminal and use the subsequent command to begin an interactive rebase.
Replace n with the number of commits you want to go back. For example, if the two commits you want to merge are the last two commits, use HEAD~2.
3. Edit the Rebase Todo List: Git will open a text editor with a list of commits. Each commit is prefixed a pick. Change pick to squash (or s for short) for the second commit you want to merge into the first commit. Leave the first commit a pick. Save and close the editor.
4. Edit the Commit Message: Git will open another editor to allow you to edit the commit message. The commit message will include the messages of both commits. Edit the message as needed, combining the messages of the two commits. Save and close the editor.
5. Complete the Rebase: Git will now combine the two commits into one. If there are no conflicts, Git will automatically complete the rebase. If there are conflicts, Git will pause the rebase and allow you to resolve the conflicts as you would during a merge.
6. Push the Changes: After resolving any conflicts and completing the rebase, push the changes to the remote repository using git push --force since the commit history has been rewritten.
It's important to note that rewriting history with a rebase can cause issues if the commits have already been pushed to a shared repository. Use caution and communicate with your team to avoid any problems.
Pull Request (PR)
To create a pull request (PR) in GitHub, follow the steps.
1. Navigate to the Repository: go to the GitHub repository in which you want to create the pull request.
2. Create a brand new department (optional): If you're running on a new function or restore, create a new department to incorporate your changes. you may try this by way of clicking on the branch dropdown and entering a brand new department call.
3. Make changes: Make the essential changes to the files on your repository.
4. Dedicate changes: Commit your modifications to your department. you can do that through the usage of the GitHub website (by clicking the "dedicate adjustments" button) or by way of using Git instructions domestically (git upload . and git devote -m "devote message").
5. Push adjustments: in case you're working on a new branch, push your branch to the faraway repository for the usage of git push beginning your branch call.
6. Create Pull Request: at the GitHub repository web web page, click on the "Pull requests" tab and then click on the green "New pull request" button.
7. pick out Branches: choose the base branch (typically predominant or grasp) and compare it with your branch containing the modifications.
8. review adjustments: GitHub will display the adjustments among the two branches. overview the adjustments to ensure everything looks correct.
9. Create Pull Request: click on the "Create pull request" button to create the pull request. enter an identification and description on your pull request, imparting details about the changes.
10. publish Pull Request: Finally, click on the "Create pull request" button to publish your pull request. this may notify the repository maintainers which you have a pull request geared up for overview.
once your pull request is created, the repository maintainers can evaluate your changes, offer remarks, and merge your changes into the base branch if they're happy with the changes.
Conclusion
In end, Git is a distributed version manage system (DVCS) that has revolutionized the manner developers control and collaborate on software program initiatives. Its dispensed nature permits developers to paintings offline and independently, with every contributor having a duplicate of the repository. This decentralization permits quicker and extra efficient improvement workflows, in addition to easier collaboration across teams and geographical places. Git's capabilities, along with branching and merging, make it clean to control complicated improvement processes and music changes over time. Its capacity to handle massive initiatives with speed and efficiency has made it the model manage gadget of desire for a huge range of projects, from small personal repositories to huge open-supply tasks. common, Git's flexibility, performance, and strong characteristic set make it an fundamental tool for contemporary software development, empowering developers to paintings greater efficaciously and collaboratively on tasks of any length.